Wednesday, July 20, 2016
Saturday, January 11, 2014
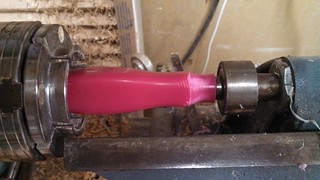
4 in 1 screwdriver
CapnEddie a user on youtube did a video on 4 in 1 screwdrivers. He took a cheap 1.99 home depot unit and broke off the plastic handle from the metal inside. He then turned a new screwdriver to fit the old screwdriver.
I started by putting the piece on my lathe and using a bowl gouge turning off the plastic handle.
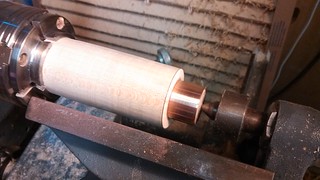
After that I have a kit with a metal piece that needs to be epoxied in after you turn the handle.
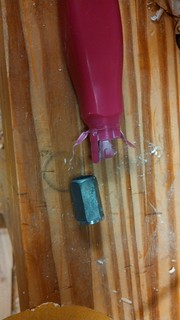

I drilled in two steps first drilling a whole to accomadate the length of the screwdriver parts. Then a larger hole just deep enough to accomadate the little metal part. The rest is turned like any other tool handle turning a step to incorporate a ferrel.
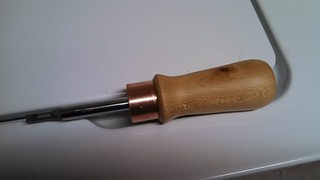
I used boiled linseed oil to finish the screwdriver.
capneddie screwdriver without a kit
I started by putting the piece on my lathe and using a bowl gouge turning off the plastic handle.
After that I have a kit with a metal piece that needs to be epoxied in after you turn the handle.
I drilled in two steps first drilling a whole to accomadate the length of the screwdriver parts. Then a larger hole just deep enough to accomadate the little metal part. The rest is turned like any other tool handle turning a step to incorporate a ferrel.
I used boiled linseed oil to finish the screwdriver.
capneddie screwdriver without a kit
Friday, January 10, 2014
Christmas Ornaments Part 2
Part two is easy for me. Spindle turnings that hang from the bottom of a globe ornament to me is about the easiest to turn. I use woods closed in grain and straight as you can. This will make it easier to turn and prevent it from breaking when you get thinner. It is possible to use open grained woods I used oak on one of the pieces I did recently so I could ebonize it with vinegar.
Tools I use are a Spindle Roughing Gouge, Calipers, and Detail gouge or Spindle Gouge. You are going to start with a blank larger than the holes made in the globe you turned earlier. I start with the piece in my scroll chuck then brace onto the tailstock until I get them round. Keep as much stock towards the headstock as you move back. This lessons vibrations and helps for making thin spindles. When you finish shaping the spindle you then make tenon using calipers and a parting tool. I create a flange between the spindle and tenon to help cover the seam between the globe and spindle. I tend to like to shape the spindle to flow from the tip up to the globe. Meaning I curve or angle the overall high points along the length to come up to the globe shape in the middle. For the top spindle I use a simple shape to put a hanger in. I will use a brass rod shaped to a loop or I have used threaded eyelets before that gets glued or screwed into the top. I test fit the tenons before gluing them permanently. unfortunate thing for me is I totally flaked on documenting this part so I just added examples of what spindles look like on my pieces.
Tools I use are a Spindle Roughing Gouge, Calipers, and Detail gouge or Spindle Gouge. You are going to start with a blank larger than the holes made in the globe you turned earlier. I start with the piece in my scroll chuck then brace onto the tailstock until I get them round. Keep as much stock towards the headstock as you move back. This lessons vibrations and helps for making thin spindles. When you finish shaping the spindle you then make tenon using calipers and a parting tool. I create a flange between the spindle and tenon to help cover the seam between the globe and spindle. I tend to like to shape the spindle to flow from the tip up to the globe. Meaning I curve or angle the overall high points along the length to come up to the globe shape in the middle. For the top spindle I use a simple shape to put a hanger in. I will use a brass rod shaped to a loop or I have used threaded eyelets before that gets glued or screwed into the top. I test fit the tenons before gluing them permanently. unfortunate thing for me is I totally flaked on documenting this part so I just added examples of what spindles look like on my pieces.
Wednesday, October 16, 2013
Christmas Ornaments Part 1
I'm doing a blog post about turning Christmas ornaments for a demonstration. This first set will be the globe ornament type where you have a hollow sphere with spindles attached to each end. There are two styles of these. One that the globe only has a hole on the bottom but still hollow and the top is placed on a jam chuck and turned to shape. Second is the one I do where you drill with a forstner bit deep enough to be through the whole globe. Then two spindles are turned from the same piece of wood for the top and bottom after hollowing. Part 1 is just about the globe. I will in part two talk about the spindles.
For starters hollowing these globes take special tools. These are basically small scrapers. Sorby sells a set of small hollowing tools that has three tools in it one for each shape on the end. One is a straight shaft second is a 45 degree bend and the other is a curved end where the cutter is 90 degrees to the handle. The curve brings the cutting edge around in line with the handle which helps in reducing catches and knowing where the cutting edge is at. Now I made my own tools by taking allen keys reshaping the ends as scrapers and sharpening them.
fig 1

Another tool you will need is a scroll chuck the way I do them. This is because its easier to hold the pieces once you start.
Wood type for this type of turning isn't all that important at this point. The spindles however I prefer a nice straight grained closed pore wood because of how thin they get turned. I've seen a few of these turned from all kinds of materials. Some were turned from LVL, plywood, various types of woods as well as Banksia pods etc. I really have liked some pieces I turned that had ray flecks one is sycamore that looks really nice turned like this.
These are going to be spindle orientation turnings. I start by turning some stock round between centers and cutting those into what I call ingots of about 3 inches long and 1 3/4 inch diameter to 2 1/2 inch diameter depending on how large you wish. fig 2. If they are larger than your chuck then each ingot needs a tenon to fit your chuck. The 2 inch ingots can be placed in your jaws easily which is why I like to start with a 2 inch or so blank. fig 3
fig 2
 fig 3
fig 3
 Next step is shaping this is up to you how you feel you want the shape to be. I tend to turn them more like globes. There are some that turned squatted globes and others turn almost cylinders fig 4. Next I tend to sand up to a certain amount fig 5. In this case I am trying out Abranet which is a sanding material which is like a mesh. I sand with it up to p600 grit.
fig 4
 fig 5
fig 5
 Next step is to use a 5/8 inch forstner bit to drill out the center fig 6. I like to drill deep enough where you can part it off later and the hole will come through. I use 5/8 inch but you could do it at other sizes but keep in mind it needs to be large enough to put the end of the hollowing tools through the opening. I like 5/8 inch because I can stick my pinky through and pinch with my thumb to determine thickness.
fig 6

Once its drilled and sanded I double check that I have sanded the end sufficiently which at this point is mostly burnished to a smooth finish and has a bit of a sheen to it fig 7. In this case I am just using wax because its easy to apply fast and durable enough for as little handling these receive fig 8. Then using a paper towel put pressure on the wax applied with the lathe on to melt the wax fig 9. The friction heats up the wax which melts into the wood and brings up a nice shine fig 10.
fig 7
 fig 8
fig 8
 fig 9
fig 9
 fig 10

At this point its time to start hollowing. I start with the straight shaft to clear some room for the other tools. In the middle scrape till you have a little bulge midway down the hole you drilled. Starting at the rim start scraping out stopping to clear chips and check progress. I use an airbrush compressor with an airbrush but you can use a straw to blow out the chips. You really want this as thin as possible so checking progress often is key. You pinch your pinky and thumb together to get a rough idea how thin. Starting with the rim ensures you wont mess up and creates a starting point for thickness reference fig 11.
fig 11


Last step is to turn the piece around. I turn a jam chuck and force the piece on. make sure its not too right or it will split the piece. Finish turning sanding the other side and apply the finish as you did with the other side fig 13.
fig 12

Coming in part 2 will be the spindles. These resemble icicles coming down from the bottom.
For starters hollowing these globes take special tools. These are basically small scrapers. Sorby sells a set of small hollowing tools that has three tools in it one for each shape on the end. One is a straight shaft second is a 45 degree bend and the other is a curved end where the cutter is 90 degrees to the handle. The curve brings the cutting edge around in line with the handle which helps in reducing catches and knowing where the cutting edge is at. Now I made my own tools by taking allen keys reshaping the ends as scrapers and sharpening them.
fig 1

Another tool you will need is a scroll chuck the way I do them. This is because its easier to hold the pieces once you start.
Wood type for this type of turning isn't all that important at this point. The spindles however I prefer a nice straight grained closed pore wood because of how thin they get turned. I've seen a few of these turned from all kinds of materials. Some were turned from LVL, plywood, various types of woods as well as Banksia pods etc. I really have liked some pieces I turned that had ray flecks one is sycamore that looks really nice turned like this.
These are going to be spindle orientation turnings. I start by turning some stock round between centers and cutting those into what I call ingots of about 3 inches long and 1 3/4 inch diameter to 2 1/2 inch diameter depending on how large you wish. fig 2. If they are larger than your chuck then each ingot needs a tenon to fit your chuck. The 2 inch ingots can be placed in your jaws easily which is why I like to start with a 2 inch or so blank. fig 3
fig 2


fig 4


fig 6

Once its drilled and sanded I double check that I have sanded the end sufficiently which at this point is mostly burnished to a smooth finish and has a bit of a sheen to it fig 7. In this case I am just using wax because its easy to apply fast and durable enough for as little handling these receive fig 8. Then using a paper towel put pressure on the wax applied with the lathe on to melt the wax fig 9. The friction heats up the wax which melts into the wood and brings up a nice shine fig 10.
fig 7


At this point its time to start hollowing. I start with the straight shaft to clear some room for the other tools. In the middle scrape till you have a little bulge midway down the hole you drilled. Starting at the rim start scraping out stopping to clear chips and check progress. I use an airbrush compressor with an airbrush but you can use a straw to blow out the chips. You really want this as thin as possible so checking progress often is key. You pinch your pinky and thumb together to get a rough idea how thin. Starting with the rim ensures you wont mess up and creates a starting point for thickness reference fig 11.
fig 11

This is the part that makes me nervous. You part it off ensuring you are far enough back to still have a rim on the back end. This one I did OK but need to fix the hole on the other side fig 12.
fig 12

Last step is to turn the piece around. I turn a jam chuck and force the piece on. make sure its not too right or it will split the piece. Finish turning sanding the other side and apply the finish as you did with the other side fig 13.
fig 12

Coming in part 2 will be the spindles. These resemble icicles coming down from the bottom.
Tuesday, August 27, 2013
Yikes its almost been a year since I posted
Working on ornaments again this year when I get off of a couple of projects I am currently doing. I am entering some turnings into the state fair. Working on a DVD cabinet for the wife and going to demo woodturning at the State Fair with the turning club.
Tuesday, September 11, 2012
9/11
11 Years ago a tragedy struck our nation. I remember the day being that I was at work. Heard the news brought up the TV channel to watch as it continued to unfold. It still seems like absurd sick hoax. Unbelievable in its brutality that anyone could perpetrate on another. I usually avoid the news around this time because its a sad reminder that there are people capable of this. Same thing for the Oklahoma City bombing. I can't bear to view humanity capable of this. I like to think of our capability for good. I try to envision a day where people do their best to get along no matter what. Its in our nature to do both its up to us to decide which path we take for the future. Hope that everyday we wake up and remember be good to each other. Lets make that our legacy.
Tuesday, August 14, 2012
Doing a little bit
Ok, so the temperatures lately haven't lent me much enthusiasm in working lately. For a while during July I would attempt to work in the garage at 10 pm range and the temperature was still in the high 90s F. That certainly put a damper on my daughters table I am working on right now. I almost have the framework for the table base finish planed. All the joinery is done for that part. I wish to finish soon so I can get back to turning. I have a special turning coming up I wish to get started on. I bought the exotic wood blanks already just need to start.
I think I should also start on Christmas ornaments soon as well so i can finish them before December, last year the birdhouses were difficult to finish on time. I need to start some dovetail work in my flat work so I can get some practice. I have a couple of big projects I wish to do so I can get those finished. There are a lot of need to projects maybe I can get started soon so no one will have to hear about them anymore.
I posted a video on Facebook about education. It was a video about Henry Rollins. The more I hear him speak the more I like him. What he has to say is profound. His ideas on Education were dead on accurate. The same sex marriage video he has on you tube was good as well.
Subscribe to:
Posts (Atom)
